

A curling wand gives you soft, undone waves; a curling iron gives you tighter, more polished curls, especially on short hair. Choose based on the finish you want, but check two things first: your hair’s length and texture, and whether the tool has genuine adjustable heat control. Get those two right and either tool will serve you well.
TL;DR:
- A curling wand produces looser, more natural waves, especially with tapered barrels, while a curling iron creates uniform, structured curls with straight barrels.
- Fine hair benefits from low heat settings on a wand to prevent damage, whereas thick or coarse hair requires higher heat and the clamp of an iron for better heat transfer.
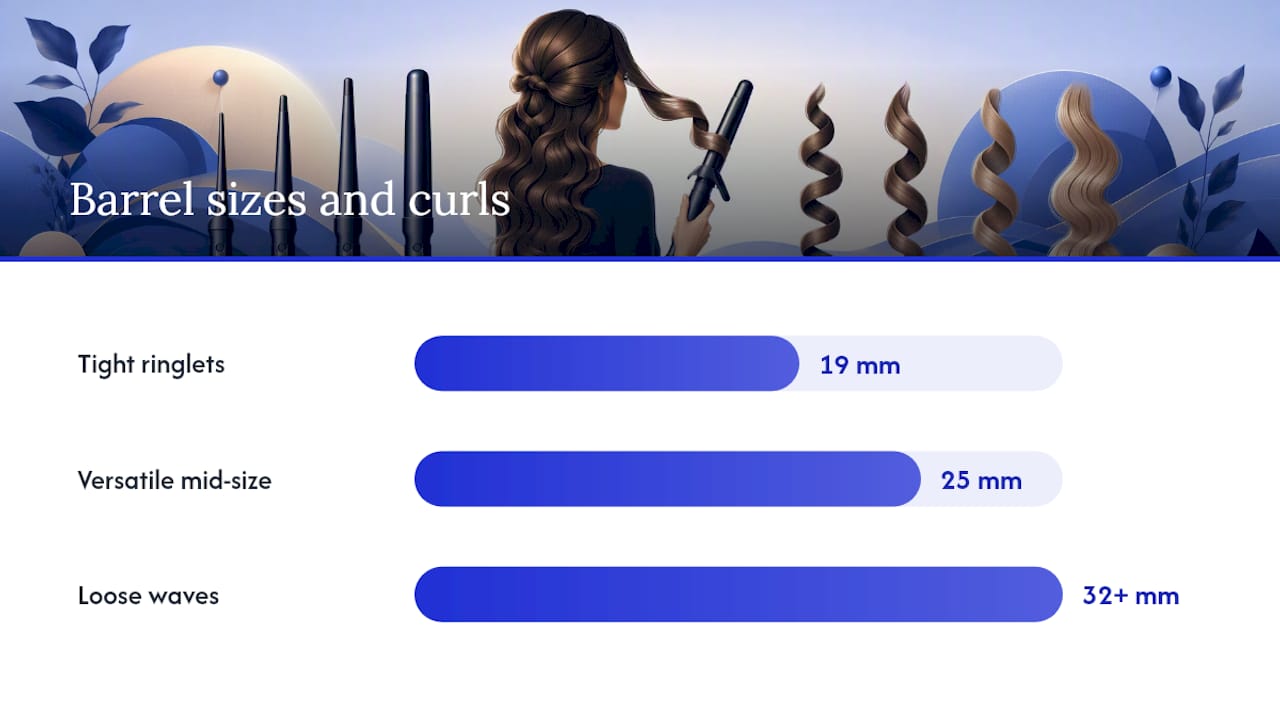
- Barrel size determines curl type, with 19mm for tight rings, 25mm as a versatile mid-size, and 32mm or larger for voluminous waves, making 25mm the safest all-round choice.
- Proper tool maintenance, such as regular barrel cleaning and cautious cord storage, extends lifespan and maintains consistent heat performance over time.
- For casual or daily styling, owning both tools offers flexibility, with wands ideal for soft waves on medium-long hair and irons better suited for defined curls or short hair.
Table of Contents
- Curling wand vs curling iron: how each tool actually curls hair
- Which tool suits your hair length and texture?
- What should you check before buying a curling wand or iron?
- How do you curl your hair with a wand or an iron?
- Why does a salon-grade aftercare routine matter?
- How do you keep a curling wand or iron working properly?
- How much should you expect to pay for a wand or iron?
- Quick scenarios: when to reach for which tool
- Shop the tools and products that make curls last
- Sources
- FAQ
Curling wand vs curling iron: how each tool actually curls hair
The difference comes down to one part: the clamp. A curling iron has a spring-loaded clamp that pins your hair against the barrel, which is what produces those neat, uniform spiral curls you see in polished blowouts. A curling wand skips the clamp entirely, so you wrap hair around the barrel by hand, and that manual wrap is exactly why wands produce a looser, more irregular S-shaped wave.
Barrel shape adds another layer to this. A tapered barrel, thick at one end and narrow at the other, creates variable curl tightness along the strand, tighter near the tip, looser at the root. A straight barrel does the opposite: uniform curl diameter from root to tip, which is why straight barrels tend to look more “done” and tapered ones look more lived-in.
Here’s what that means for your results:
- Curling iron + straight barrel: crisp, repeatable spirals, ideal for structured styles.
- Curling wand + tapered barrel: relaxed, beach-style waves with natural variation.
- Curling wand + straight barrel: a middle ground, soft waves without the taper effect.
- Curling iron used wand-style: wrapping hair over an open clamp can mimic a looser wave, so one tool can sometimes do both jobs with a technique change.
Which tool suits your hair length and texture?
Fine hair curls fast and burns easily, so lower temperatures matter more than which tool you use. That said, a wand often works better here because there’s no clamp pressing a crease into delicate strands, which means fewer of those telltale kinks at the root.
Thick or coarse hair is the opposite problem: it resists heat, so a curling iron’s clamp can actually help by holding hair firmly against the barrel long enough for heat to penetrate properly. Short hair, meanwhile, leans toward the iron for a simple reason: safety and control. Wrapping short lengths around a bare wand near your scalp is fiddly and increases the chance of touching hot metal to your skin, while a clamp gives you something to hold onto.
Medium and long hair genuinely can go either way; it’s a finish decision, not a hair-health one.
- Fine hair: wand, with a lower heat setting to protect delicate strands.
- Thick or coarse hair: iron, using moderate to higher heat, with the clamp aiding heat distribution.
- Short hair: iron, favored for better control and safety near the scalp.
- Medium to long hair: either tool works; select based on desired curl style—wand for waves, iron for defined curls.
The trade-offs worth weighing before you buy: irons risk visible creasing where the clamp meets hair, wands demand more wrist practice to get even results, and both carry burn risk if you rush the technique. Curl longevity tends to favour whichever tool matches your natural texture, since fighting your hair’s grain with excess heat only shortens hold time.
Pro Tip: If your curls always seem to fall flat by mid-afternoon, the fix might be your wash schedule, not your tool. Second-day hair holds a curl noticeably longer than freshly washed strands, because it has more grip for the barrel to catch.
What should you check before buying a curling wand or iron?
Barrel size decides your curl type more than any other spec. A 19mm barrel produces tight ringlets, a 25mm barrel is the versatile mid-size most people reach for, and anything 32mm or above gives you loose, voluminous waves. If you’re only buying one tool, 25mm is the safest all-rounder.
Barrel material matters almost as much. Ceramic and tourmaline coatings distribute heat evenly and cut down on frizz, which suits most hair types. Titanium heats faster and holds a higher maximum temperature, useful for thick or resistant hair, but it runs hotter overall and demands more care with fine or damaged strands.
Beyond barrel size and coating, prioritise these features:
- Accurate digital temperature control, not a vague low/medium/high dial. Experts consistently rank adjustable, precise heat above barrel marketing or brand name when it comes to protecting hair.
- A heat-resistant glove, essential for wands and genuinely useful for irons too.
- Auto shut-off, a small safety feature that matters more than it sounds.
- A swivel cord, which prevents tangling mid-style and makes wrist rotation easier on wands specifically.
Cheap single-setting tools might curl hair once. They rarely do it without damage over repeated use.
How do you curl your hair with a wand or an iron?
Start with fully dry hair; heat tools on damp hair cause steam damage, not curls. Apply a heat protectant, then section your hair into pieces roughly one to two inches wide, smaller sections for tighter curls, wider ones for loose waves.
Wand technique:
- Hold the wand vertically with the tip pointing down, which stops hair sliding off mid-wrap.
- Start about an inch from the root and wrap hair around the barrel, avoiding the clamp-free tip for the last few centimetres.
- Hold for 8 to 12 seconds depending on your hair’s thickness, then release slowly.
Iron technique:
- Clamp a section near the root, leaving the very ends free for a more natural finish.
- Rotate the iron a full turn and hold it vertically as it slides down the length.
- On short hair, start slightly lower than you think you need to, to avoid over-curling the ends.
Whichever tool you use, cup the curl in your palm for about ten seconds after release before touching it again. That brief cooling window is what actually locks the shape into the hair’s cuticle.
Pro Tip: Skip the brush once curls are set. Brushing breaks up the curl pattern into frizz; finger-combing keeps the shape while still separating strands.
Why does a salon-grade aftercare routine matter?
Any curl, however you make it, is only as good as the hair underneath it. Salon-grade formulas are designed to hold up to daily heat styling in a way supermarket alternatives often don’t.
Before you pick up any curling tool, a heat protectant should be non-negotiable, not optional. After curling, a lightweight curl cream helps define the shape without weighing it down, a leave-in conditioner rebuilds moisture heat pulls out, and a finishing spray locks the whole look in place. For deeper repair between styling sessions, our curly hair routine guide walks through building a routine around your specific curl type, and our heatless curls guide is worth bookmarking for the nights you want a break from heat altogether.
How do you keep a curling wand or iron working properly?
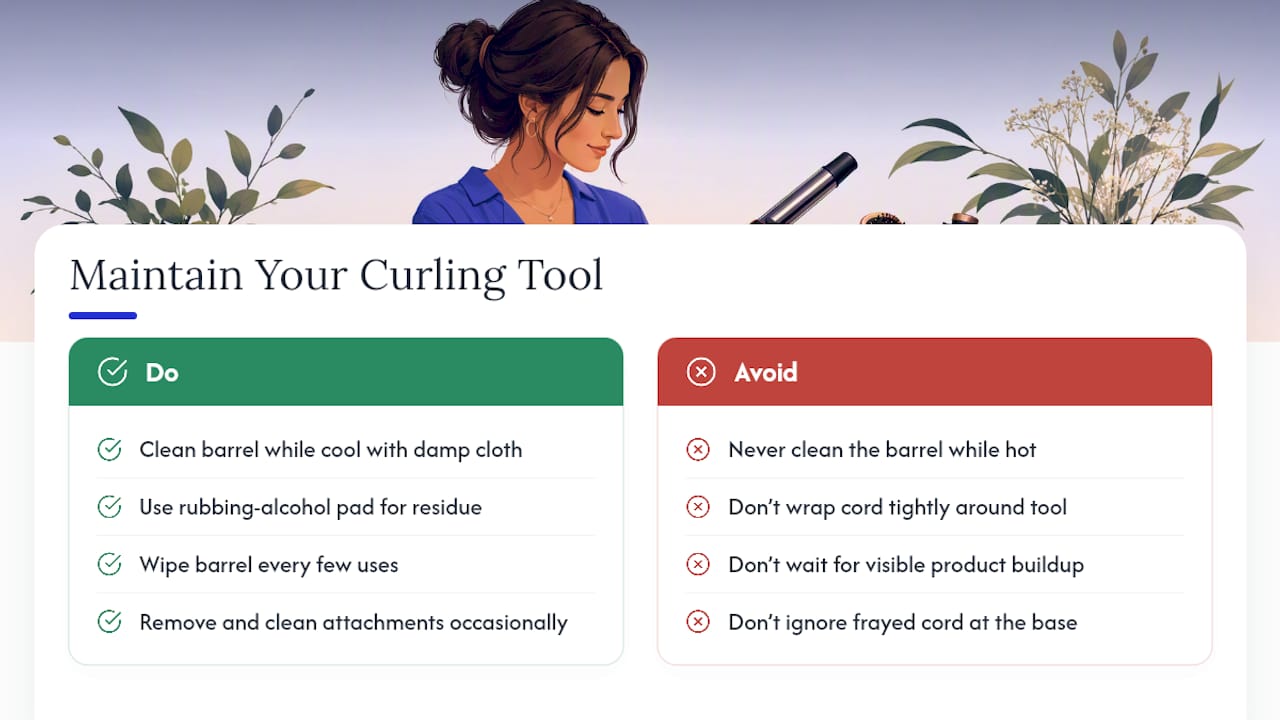
Heat build-up on a dirty barrel is the fastest way to shorten a tool’s lifespan and dull your curl results. Product residue, hairspray in particular, bakes onto the barrel every time you style, and over months that film insulates the heat unevenly, meaning some sections of your hair curl faster than others.
Clean the barrel while it’s cool, never hot, with a damp cloth or a cotton pad lightly dampened with rubbing alcohol. Focus on the seams around the clamp on an iron, where product tends to collect and hide. Wipe down the whole barrel after every few uses rather than waiting for visible build-up.
Check the cord regularly for fraying near the base, where bending happens most, and store the tool with the cord loosely coiled rather than wrapped tightly around the body. Tight wrapping stresses the internal wiring over time and is one of the more common reasons heat tools fail early.
If your tool has interchangeable barrels or attachments, remove them occasionally to clean the connection point, since residue there can cause the barrel to heat inconsistently or stop locking in properly. A tool that’s cared for this way will hold its temperature accuracy for years rather than drifting hotter or cooler as it ages, which matters just as much for hair health as the buying decision itself.
How much should you expect to pay for a wand or iron?
Price ranges for curling wands and curling irons overlap more than most buying guides suggest, and the split usually comes down to features rather than which style of tool it is. Budget options at the low end, single barrel, single heat setting, tend to sit in the same rough price bracket whether they’re a wand or a clamp iron.
Where the price climbs is with precise digital temperature control, better barrel coatings like tourmaline or titanium, and interchangeable barrel sets, which some wands offer as a single multi-barrel unit covering several curl sizes in one purchase. A multi-barrel wand can work out better value than buying two or three separate single-size irons, if you actually use the different barrels.
Higher-end irons with digital displays and rapid heat-up times sit at a similar price point to premium multi-barrel wands. The genuine cost difference isn’t wand versus iron; it’s cheap single-setting tools versus anything with real temperature accuracy and quality coating. Spending more upfront on the latter tends to pay off through fewer damaged strands and a tool that lasts several styling seasons rather than one.
Quick scenarios: when to reach for which tool
For everyday soft waves on medium to long hair, I reach for a wand every time, especially with a straight barrel for a slightly more polished wave. For short hair or an event that calls for defined ringlets, an iron wins on control and finish. Truthfully, if you style often, owning both isn’t overkill; they solve different problems, not the same one twice.
— Burgs
Shop the tools and products that make curls last
Getting the curl is only half the job; keeping it soft, defined, and undamaged is where Prohair comes in. Rather than chasing another gimmicky attachment, Prohair gives you access to professional-grade hair tools built for salon results at home, paired with the aftercare formulas salons actually use behind the chair.
Whichever tool you’ve settled on, the products around it matter just as much. A heat protectant shields your strands before you even switch the barrel on, a curl definer locks in shape without stiffness, and a good detangling curl brush helps you separate curls the next morning without breaking the pattern. If your hair needs deeper repair after a heavy styling week, browse Prohair’s treatments range for options built specifically for heat-stressed strands. Orders over a certain amount ship free, adding convenience to your purchase. Head to the Prohair shop to browse the range and get your next order moving.
Sources
- Curling irons vs curling wand: how to use a curling iron the right way — Good Housekeeping
- How to use a curling wand for surfer-girl waves — Glamour UK
- Curling wand or curling iron — Fashion Gone Rogue
- 5-in-1 curling wand: which barrel for each look — Bombay Hair
FAQ
Can I use my curling iron as a curling wand?
Yes. You can wrap hair over an open clamp instead of clamping it shut, which produces a looser, wand-style wave. It takes a bit more wrist control since there’s nothing holding the hair in place for you.
Is a curling wand better for your hair than a straightener?
Neither tool is inherently safer; both apply direct heat, so the real factor is temperature control and how often you use them. A wand with accurate digital heat settings and a straightener used at a sensible temperature carry a similar damage risk when heat protectant is used consistently.
What type of curler is best for beginners?
A curling iron with a clamp is generally easier to learn on because the clamp holds hair in place while you manage the rest of the technique. A curling wand has a slightly steeper learning curve since you’re wrapping and holding hair by hand without anything securing it.
Which is better for short hair, a curling wand or a curling iron?
A curling iron is the better choice for short hair, since the clamp gives you more control close to the scalp and reduces the chance of touching hot metal to your skin. Starting the curl slightly lower than usual also helps avoid over-curling the shorter ends.